TABLE OF CONTENTS
- Configuration
- Locker map and locker delivery
- Display the couriers on the map
- How to generate shipping labels?
Configuration
Packeta is also known as Coletaria, Csomagkuldo, Zasilkovna, Zasielkovna, Packeta DE, Packeta PL.
To connect Packetery service in xConnector go to:
xConnector - Profile - Connected Services - Connect a new service - Shipping labels - Connect a courier - select Packetery and fill in your credentials.
You can find your Packeta credentials here: client.packeta.com/en/support (Packeta platform - API credentials from the top-right part of the page).
If you ship with multiple carriers, in xConnector you need to add one Packeta connector for each carrier available through the Packetery platform, and for each service you use (Home delivery and/or Locker delivery).
Example:
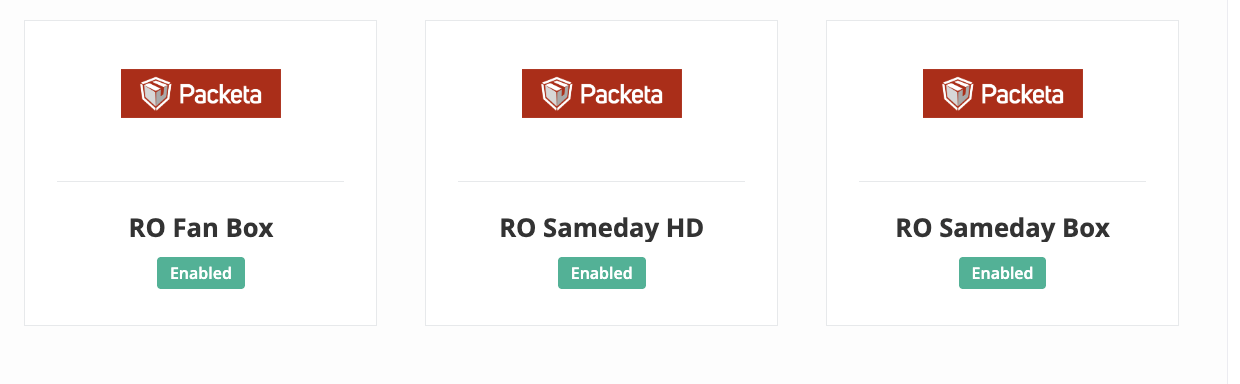
You ship with
- Fan courier (locker delivery: RO Fan Box)
- Sameday (home delivery: RO Sameday HD)
- Sameday (locker delivery RO Sameday Box)
In xConnector you have connected 3 Packetery connectors, one for each carrier and service.
Note
HD: Home delivery
Box: Locker delivery
Even if it is the same courier, if you use two different services — one for locker delivery and one for home delivery — you need to connect two separate connectors, one for each specific service.
When you generate documents, you'll select the exact connector based on the courier you are shipping with and the service required (home delivery or locker delivery).
Example: RO Sameday HD and RO Sameday Box
How to connect the Packetery service in xConnector?
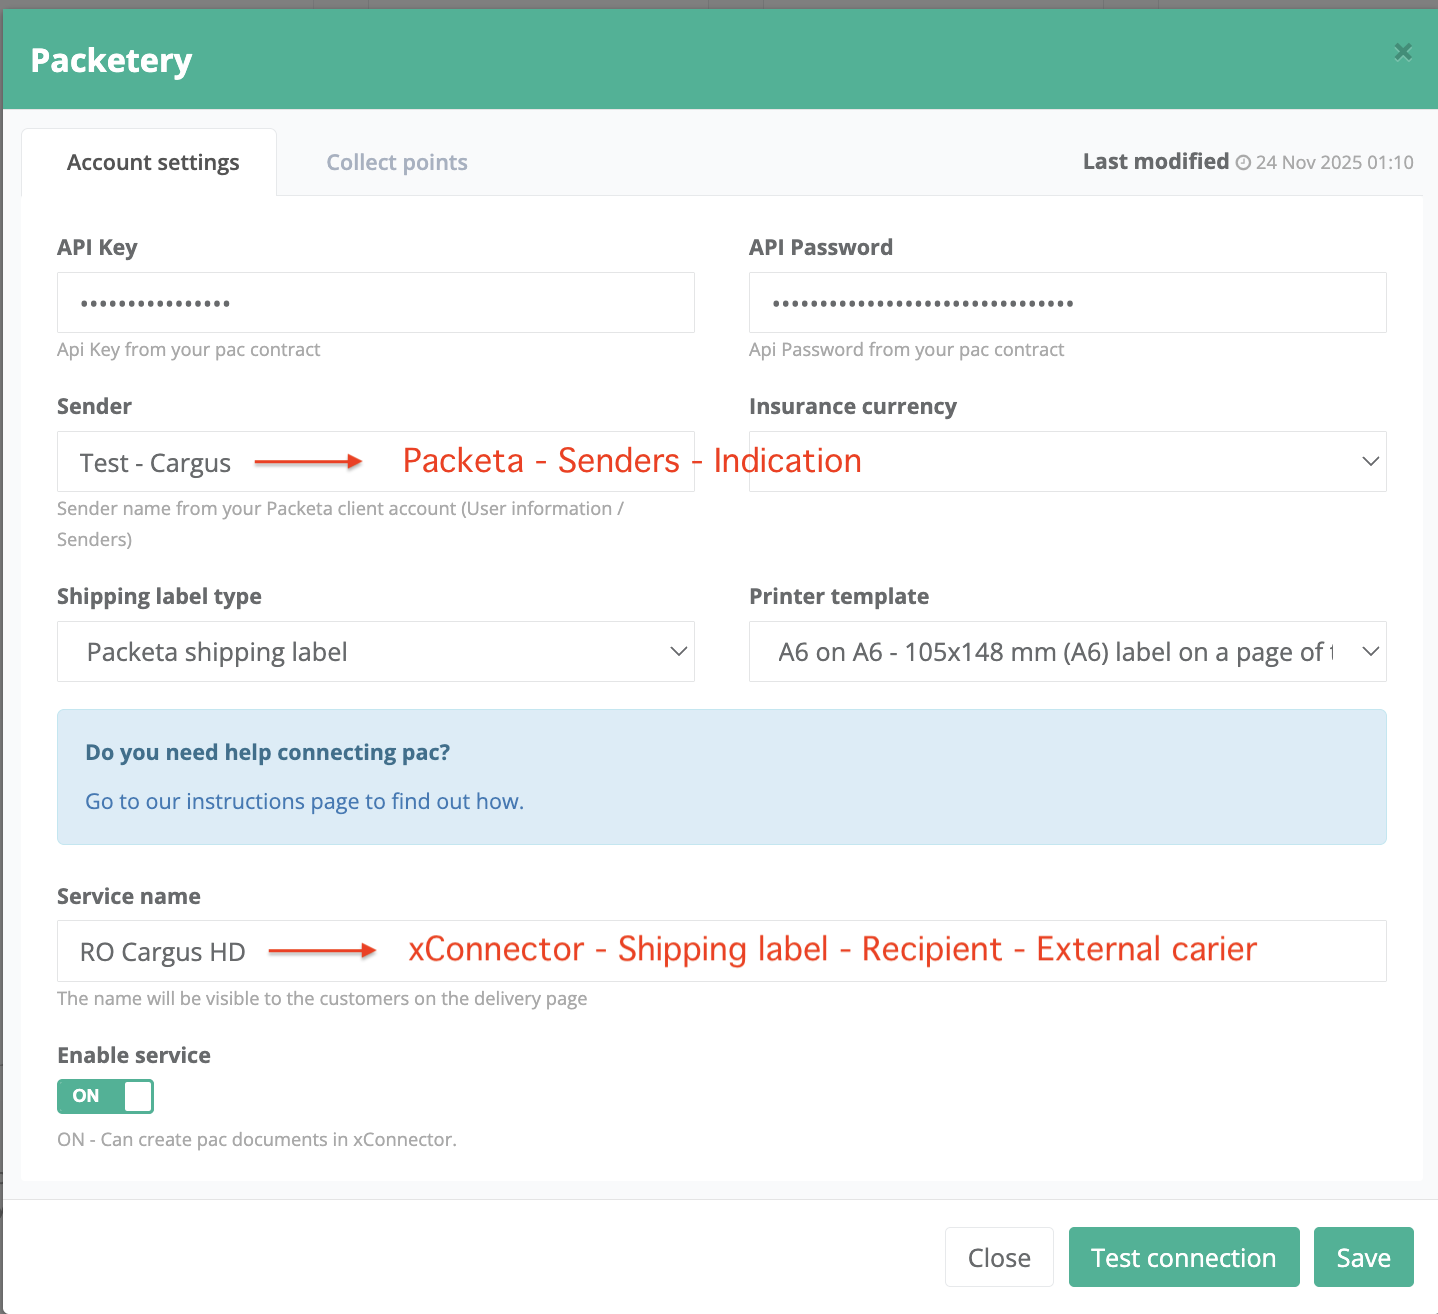
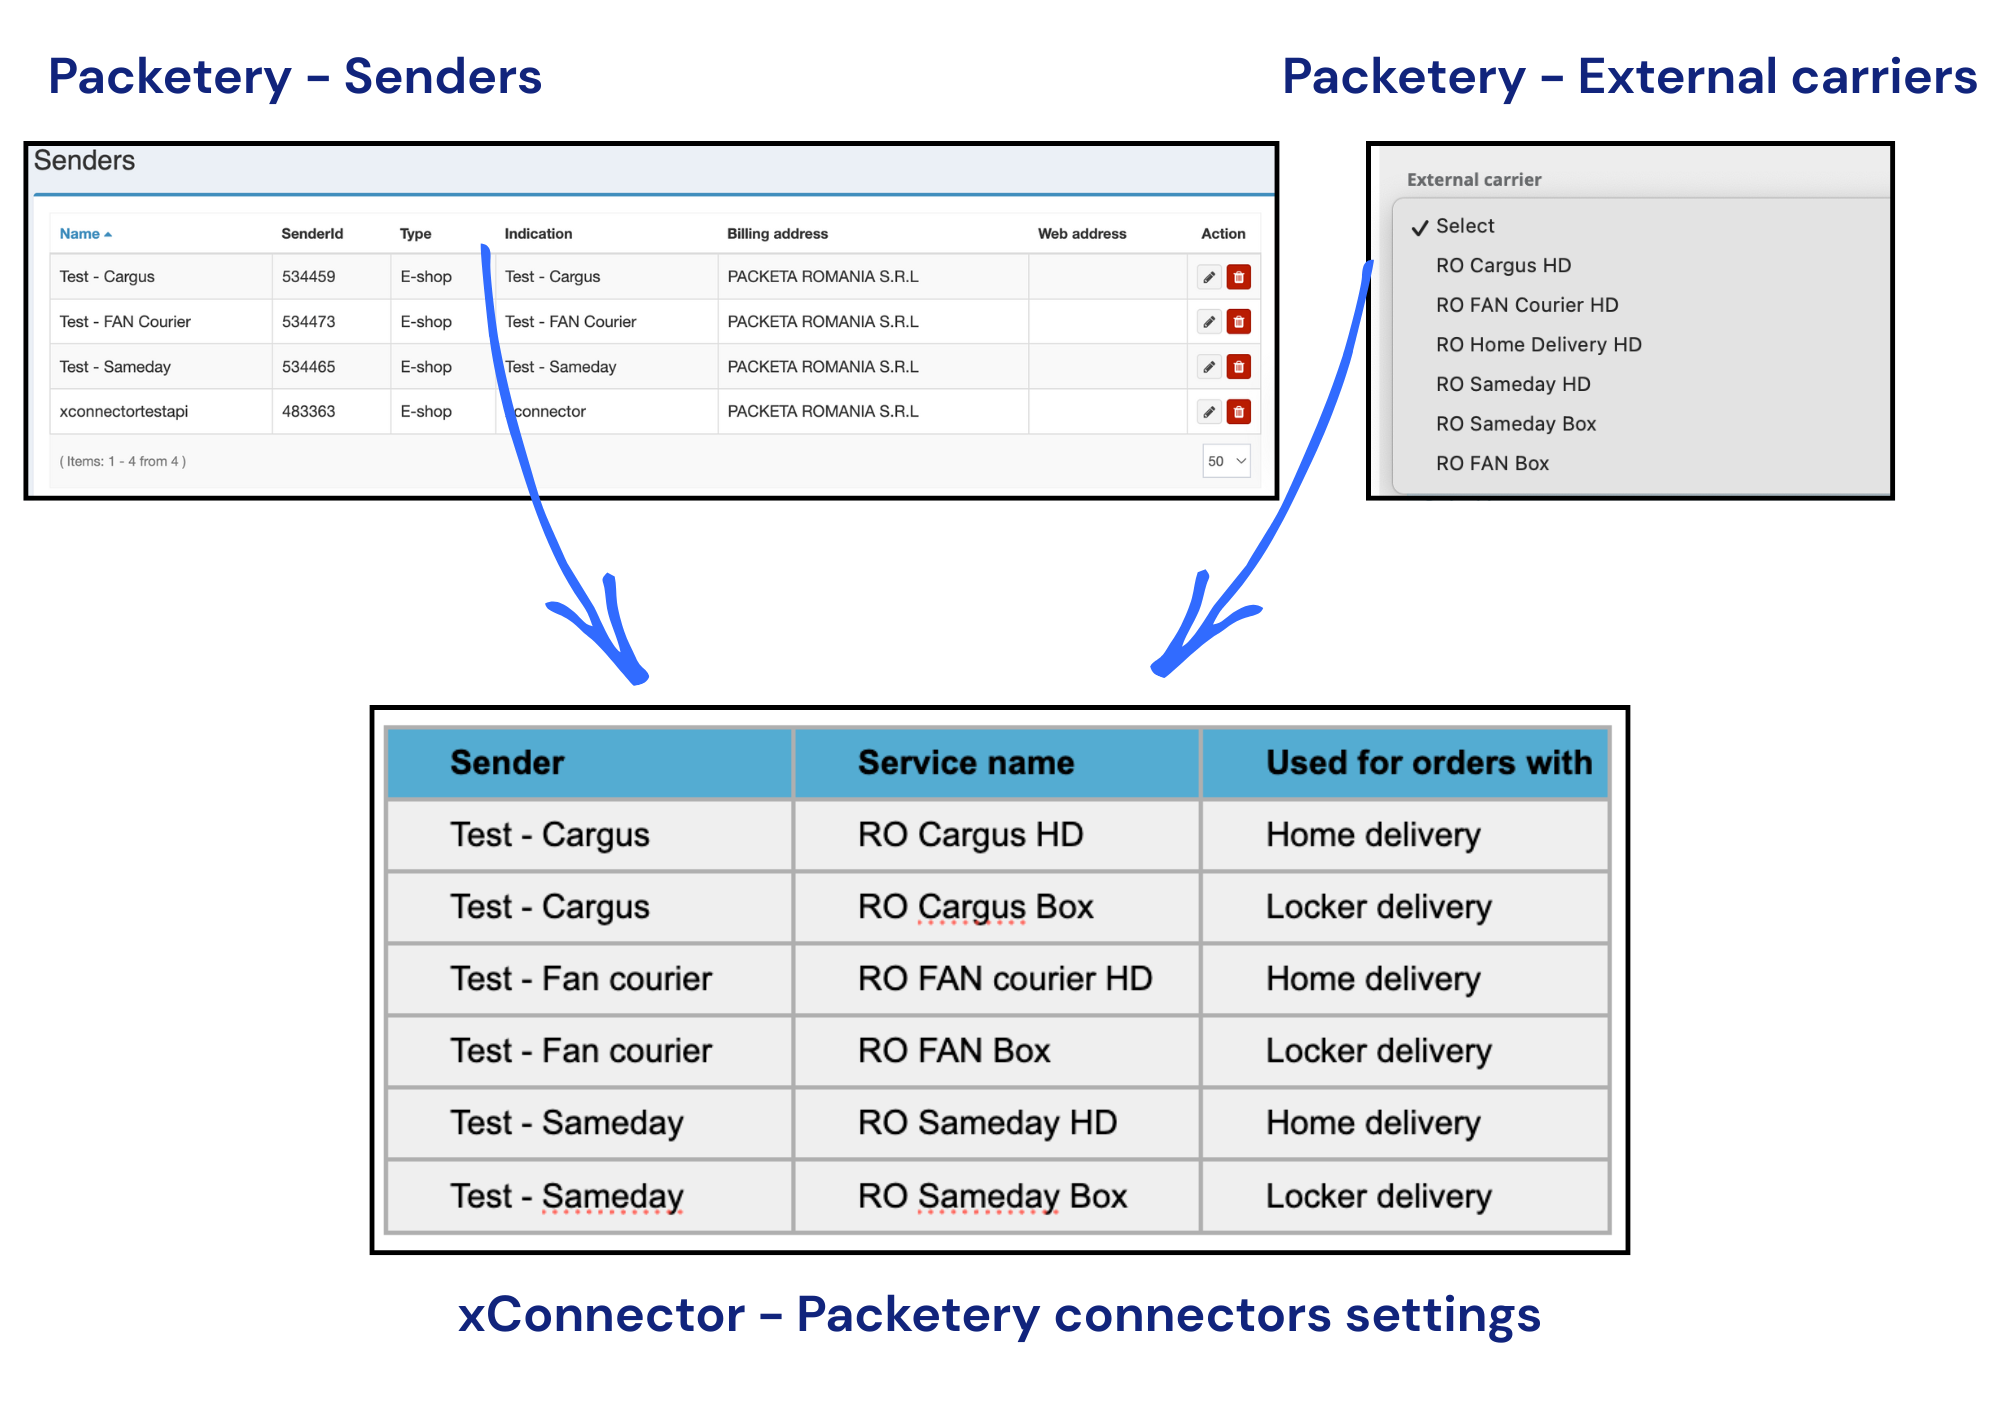
Connect a separate Packeta connector for each sender and each external carrier, and rename the service name to match the correct service.API Key - fill in the API Key
API Password - fill in the password
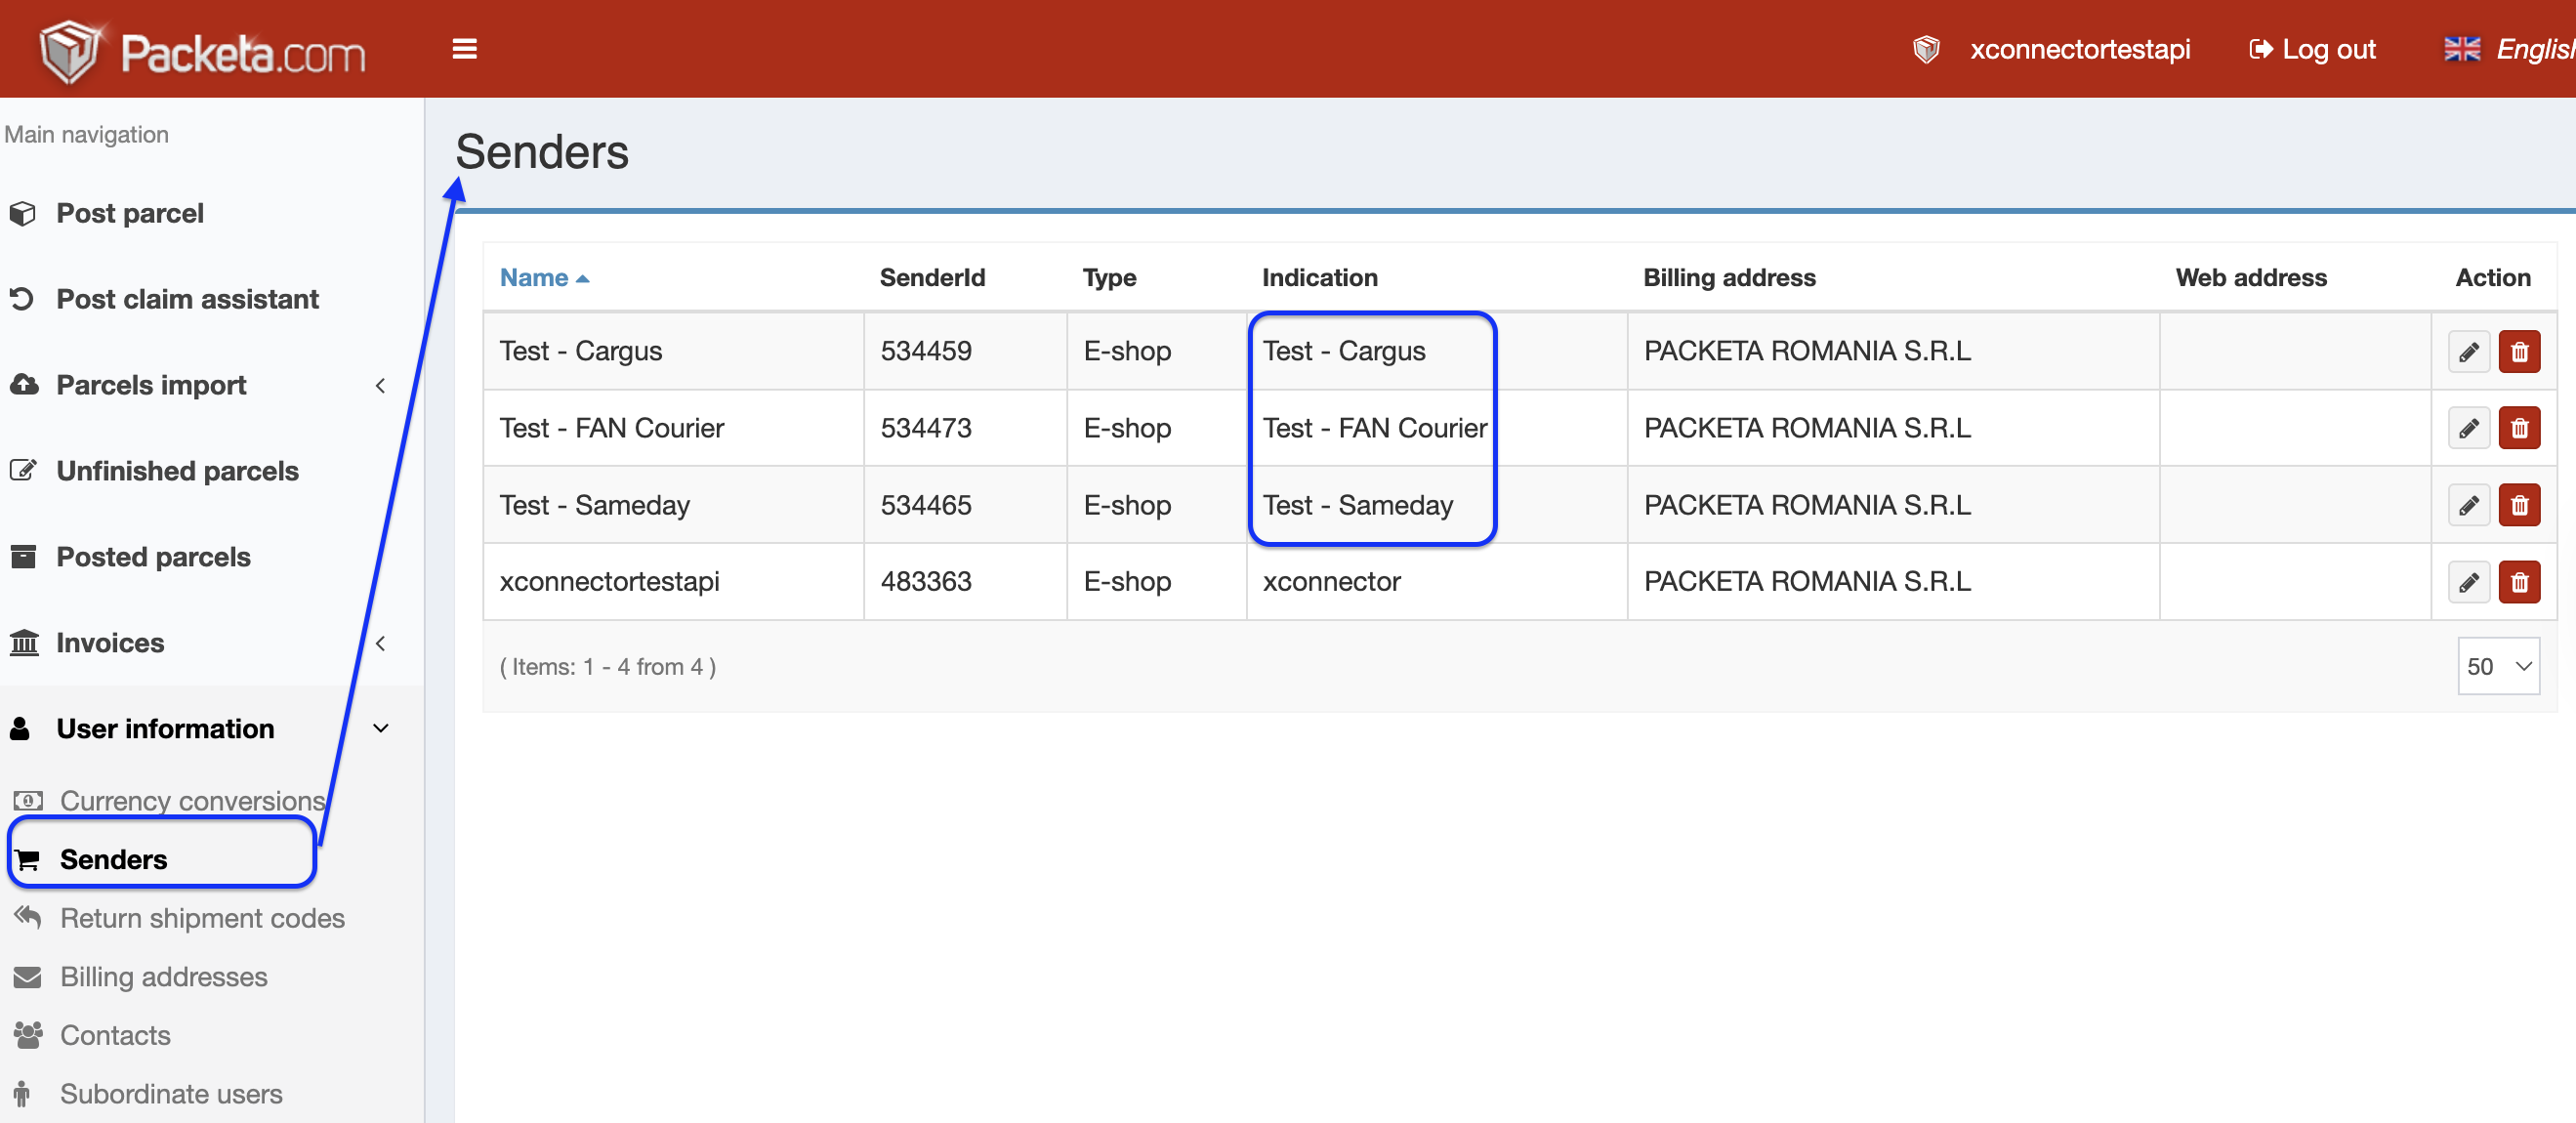
Sender*: fill in the Sender name from platform Packeta - Senders - Indication
Service name**: fill in the name from External carrier list
Shipping label type: select the shipping label template (Courier or Packetery label)
Click Test connection (you should receive the Successful connection message).
Click Save.
* Sender = Packeta - Senders - Indication - here are all your activated Senders
** Service name = xConnector - Create a shipping label (individual not BULK) - Recipient - External carrier
1. Generate an individual shipping label in xConnector. Click on this button: 
2. In the Recipient step, you will find the list for External carrier.
Check the name corresponding to the desired courier and save it under Service name.
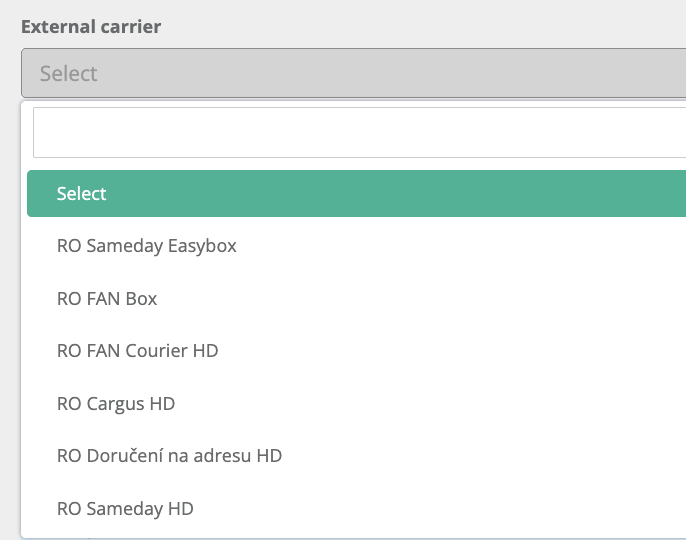
Example
Service name: RO Cargus HD
Conclusion:

If you have 3 couriers in the Packetery platform, you will have 3 connectors for Home delivery and 3 connectors for Locker delivery (if you choose to offer Locker delivery for each one).
The number of the connectors depends on how many Senders and what services do you use. Below are all the possible options for 3 couriers. You can choose your own desired connectors.
Locker map and locker delivery
If you need to install the locker map and display the lockers from the carriers you have activated in Packetery, follow the settings below.
https://xconnector.freshdesk.com/support/solutions/articles/103000015872-collect-points-lockers
Display the couriers on the map
Packetery is an aggregator for multiple courier services.
If you have activated the Packeta locker map, all Packeta lockers will be displayed by default.
If you want to display only certain lockers instead of all of them, you need to filter the lockers by creating a filter rule that specifies which courier’s lockers should appear.
Steps:
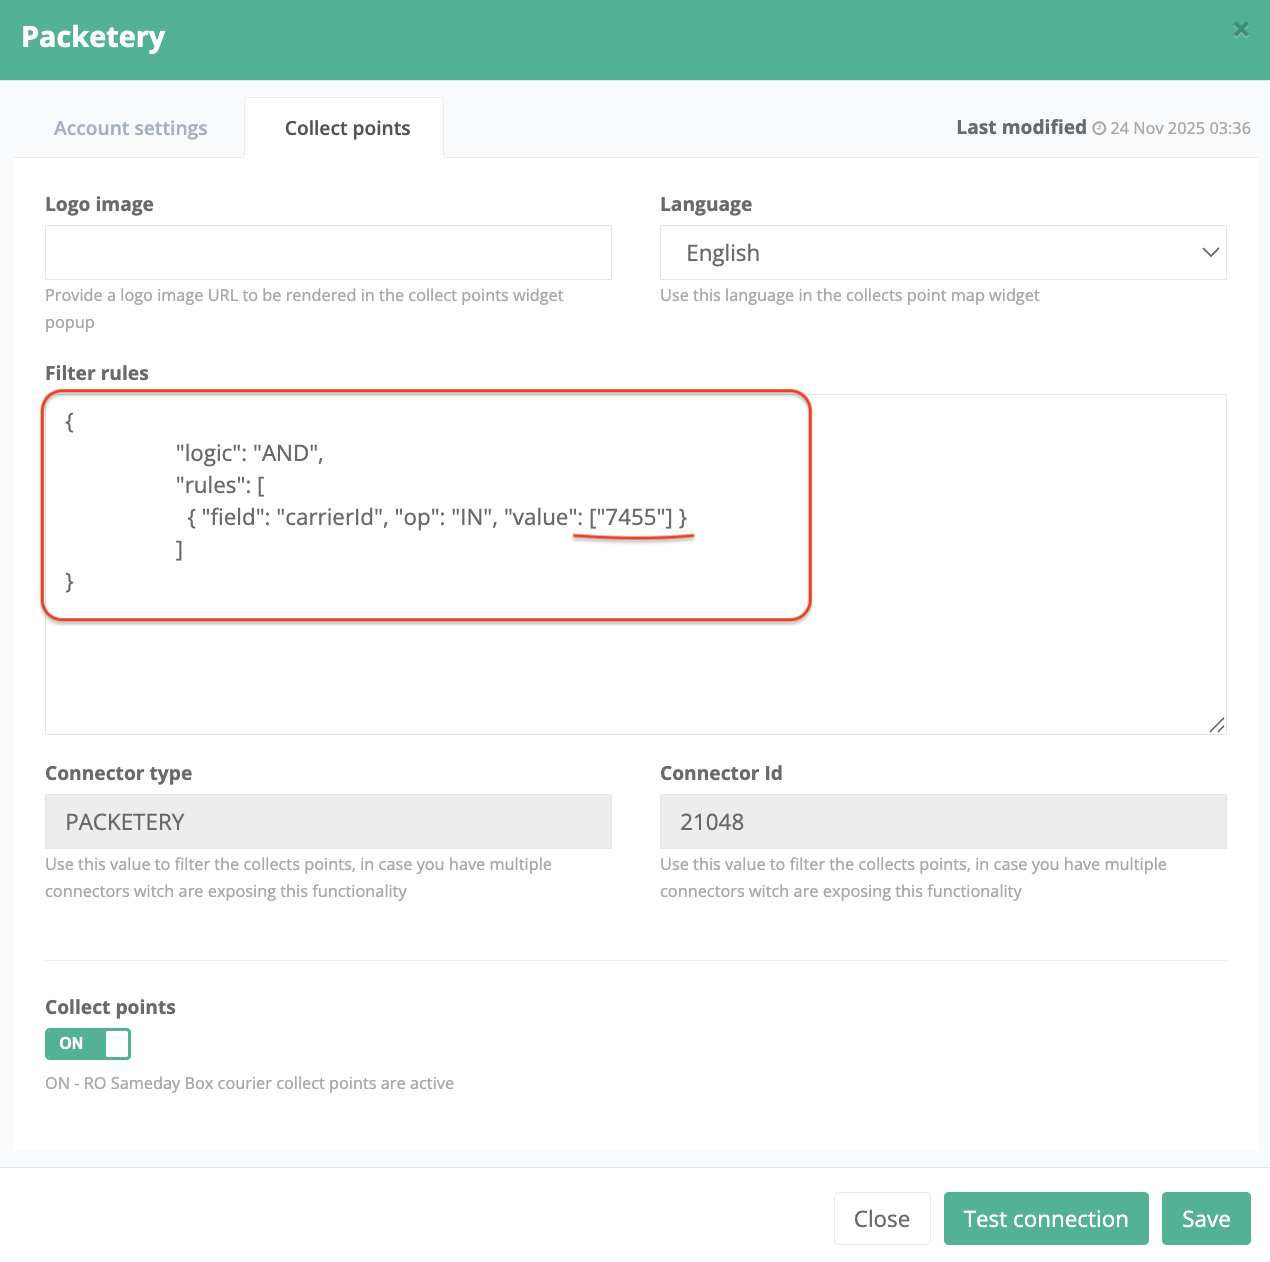
Go to xConnector → Profile → Connected services → the Packetery connector you want to display on the map → Collect points → Filter rules
Add the following code, replacing the value with the internal Packeta ID of the courier you want to show on the map:
{
                   "logic": "AND",
                   "rules": [
                     { "field": "carrierId", "op": "IN", "value": ["xxxxx"] }
                   ]
}
xxxxx - replace it with the internal Packeta ID of the courier
Atention! in this code only this caracter is accepted!
" After you copy and paste the code, make sure you don’t have this one.
”Courier's IDs
Austria
AT Austrian Post : 80
CZ Packeta Home : 106
SK Packeta Home : 131
SK Packeta Evening Delivery Bratislava : 132
CZ Zasilkovna Evening Delivery Ostrava : 134
Romania
RO Cargus : 590
RO FAN Courier : 762
RO Home Delivery : 4161
RO Sameday : 7397
RO Sameday Box : 7455
RO FAN Box : 32428
Hungary
HU Hungarian Post : 763
HU Hungarian Post Pickup : 4539
HU Express One : 3828
HU Home Delivery : 4159
HU FoxPost Box : 32970
HU Magyar Post Box : 29760
Bulgaria
BG Speedy : 4015
BG Speedy Pickup : 4017
BG Econt : 19469
BG Econt Box : 19470
BG Econt Pickup : 19471
BG Sameday : 26066
BG Sameday Box : 26067
BG BoxNow Box : 33777
Poland
PL InPost Paczkomaty Box : 3060
PL Home Delivery : 4162
PL Poczta Polska Pickup : 14052
France
FR Colissimo Pickup : 4307
FR Colissimo Home : 4309
FR Mondial Relay Pickup : 12889
FR Colis Prive Home : 16080
Germany
DE Hermes Home : 6373
DE Hermes Pickup : 6828
DE Home Delivery : 13613
Netherlands
NL Dutch Post : 4329
NL DHL Home : 8000
NL DHL Pickup : 8001
Italy
IT Bartolini Home : 9103
IT Bartolini Pickup : 9104
IT Bartolini Box : 29678
IT Italian Post Home : 29192
IT Italian Post Pickup : 29660
IT Punto Poste Pickup : 32528
IT HR Parcel : 12154
Spain & Portugal
ES Correos : 4638
ES MRW Home : 4653
ES MRW Pickup : 4654
PT MRW Home : 4655
PT MRW Pickup : 4656
Nordics & Baltics
SE PostNord Pickup : 4826
SE PostNord Home : 4827
FI PostNord Pickup : 4828
FI PostNord Home : 4830
FI Matkahuolto Home : 26985
FI Matkahuolto Pickup : 26986
FI Matkahuolto Box : 26987
EE Omniva Home : 5060
EE Omniva Pickup : 5061
EE Omniva Box : 5062
LV Omniva Home : 5063
LV Omniva Box : 5064
LT Omniva Home : 5065
LT Omniva Box : 5066
Greece
GR Taxydromiki : 8847
GR Speedex : 12235
GR ACS Home : 17465
GR ACS Pickup : 17467
GR BoxNow Box : 20409
GR Elta Courier Home : 27954
GR Elta Courier Pickup : 27955
Other countries
HR Croatian Post Home : 4634
HR Croatian Post Pickup : 4635
HR Overseas Home : 10618
HR Overseas Pickup : 10619
HR BoxNow Box : 35319
CH Post Direct Home : 29738
CH Post Direct Priority : 30383
IE Fastway : 9990
AE Aramex : 10693
US FedEx Priority : 19325
US FedEx Economy : 19326
TR FedEx Priority : 19328
TR FedEx Economy : 19327
Example:
From all the couriers activated in the Packetery platform, I only need to display Sameday lockers:
RO Sameday Box : 7455
So, I go to xConnector → RO Sameday Box connector → Collect points.
In the Filter rules field, I save the code and fill in the Sameday ID (the Packetery internal ID for Sameday=7455).
Result:
On the locker map, only Sameday lockers will be displayed, not all lockers from all the couriers in my Packetery account.
Repeat the same steps for all the other couriers you want to keep on the map, and fill in the correct Courier ID for each of them.
How to generate shipping labels?
In xConnector, you can filter orders based on the lockers selected in the orders, and then you know exactly which connector is suitable for them.
Go to xConnector - New orders - Filters - Connectors

1. Individual (for one order)
Click the Create shipment button
Step: Courier – select the Packetery connector
Step: Recipient – select the External carrier
2. BULK (for multiple orders)
Select multiple orders that are assigned to the same Connector (for example: all orders for which you need to generate shipping labels for Sameday Locker using RO Sameday Box).
Click the Create documents button.
Step: Courier – select the Packetery connector RO Sameday Box (you do not need to manually select the External carrier).
Contact
➡️ Need help with xConnector? We are just a message away:
Chat: click the blue chat icon (bottom-right)
E-mail: support@xconnector.app
Phone: +4 0373 747 991
➡️ Stay connected with xConnector:
Facebook group: https://www.facebook.com/groups/shopify.romania.xconnector
Facebook page: https://www.facebook.com/xConnectorApp
TikTok: https://www.tiktok.com/@xconnector.app
YouTube: https://www.youtube.com/@xconnector_app
Was this article helpful?
That’s Great!
Thank you for your feedback
Sorry! We couldn't be helpful
Thank you for your feedback
Feedback sent
We appreciate your effort and will try to fix the article