Automatically place locker orders on hold until the customer selects a collect point.
This setup uses 2 Shopify Flow workflows that work together.
Its purpose is simple:
- when an order is created with a locker / collect point delivery method, the order is automatically placed On Hold
- this prevents the shipping label from being created before the customer selects the locker
- once the customer selects the collect point from the locker map, the order is automatically released from hold
This is useful for stores that offer locker delivery and want to avoid processing orders before the final collect point is chosen.
What these flows do
Flow 1 - Put locker orders on hold automatically
When a new order is created, the flow checks whether the order uses a locker shipping method.
If yes, the flow:
- places the fulfillment order on hold
- adds the tag
ON_HOLD - adds the note
ON_HOLD (locker not selected)
This means the order is clearly marked and cannot move forward to shipping label generation until the locker is selected.
Flow 2 - Release the order automatically after locker selection
When the customer selects a collect point from the locker map, the second flow is triggered.
It then:
- releases the fulfillment order hold
- removes the tag
ON_HOLD - clears the order note
At this point, the order is ready to continue normally and the shipping label can be created.
Important!In the first flow, you must manually replace the placeholder text:
[insert_here_a_text_from_your_locker shipping line]
with a word or text fragment from your actual locker delivery method name.
Example
If your shipping method is called:
- Easybox Delivery
- Locker Pickup
- Sameday Locker
you should replace the placeholder with a text that identifies that shipping method clearly, such as:
- Easybox
- Locker
- Sameday Locker
The flow uses this text to detect which orders should be placed on hold.
If this text is not updated correctly, the flow will not identify locker orders.
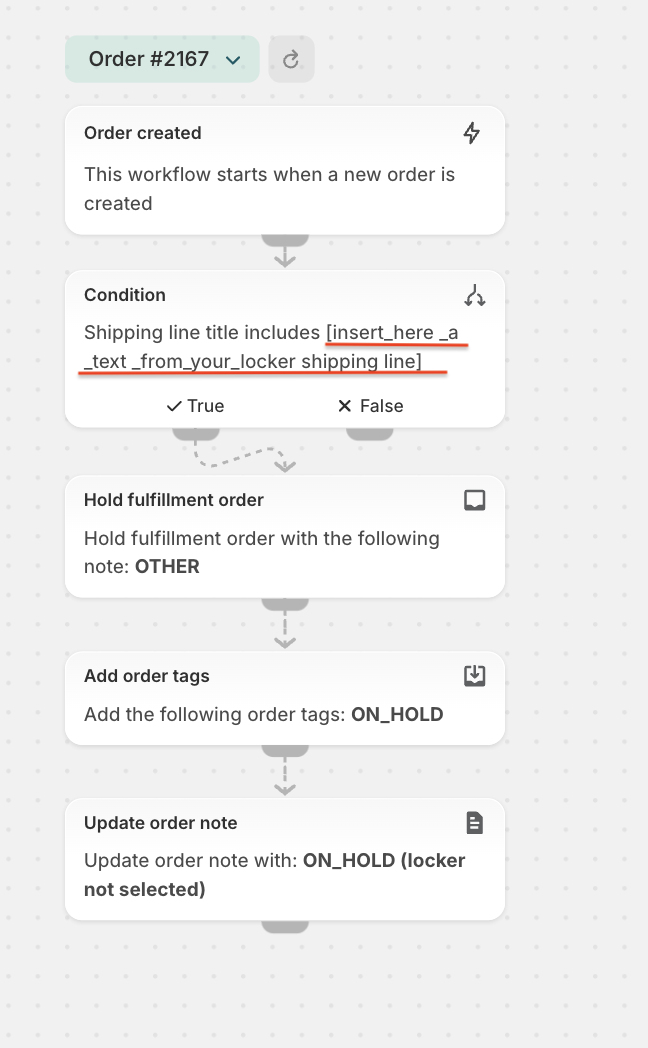
Flow 1 - Automatically hold orders with locker delivery
Flow explained:
Order created
This means the workflow starts automatically every time a new order is created in Shopify.
Condition
Shipping line title includes [your locker delivery text]
The flow checks the shipping method name used on the order.
If the shipping line title contains the text you added, the order is treated as a locker order.
Actions performed
1. Hold fulfillment order
The flow applies a hold to the fulfillment order.
In simple terms, this blocks the order from being processed for shipping too early.
This is important because a shipping label should not be created until the customer has selected the exact locker.
2. Add order tag
The flow adds the tag:
ON_HOLD
This helps you easily identify these orders in Shopify filters, views, or automations.
3. Update order note
The flow adds the following note:
ON_HOLD (locker not selected)
This gives a clear explanation directly on the order, so anyone checking it understands why the order is blocked.
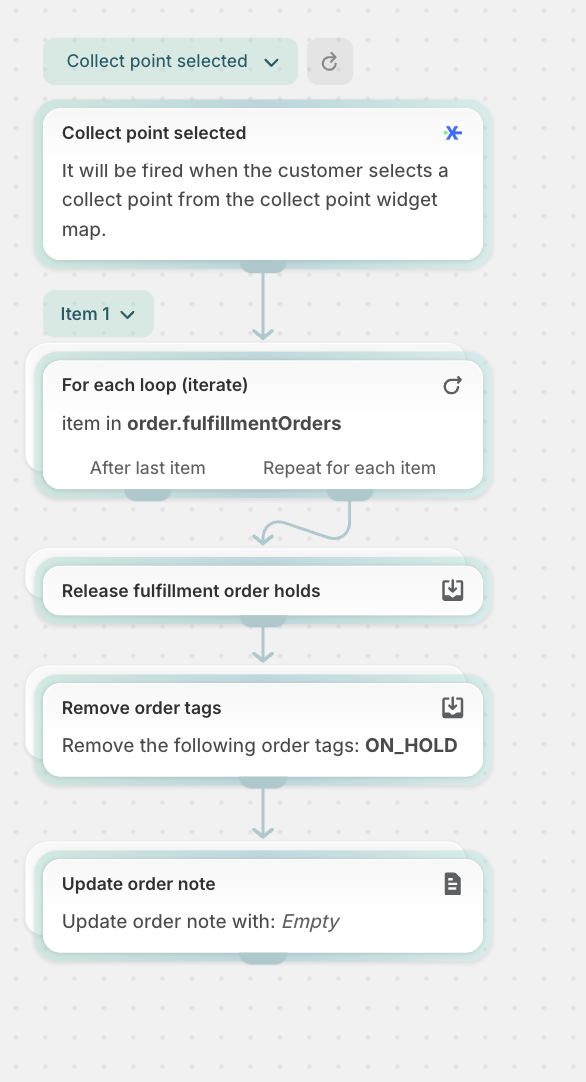
Flow 2 - Automatically release the order after locker selection
Flow explained:
Collect point selected
This flow starts when the customer selects a collect point from the collect point widget map. In other words, the customer has now chosen the locker, so the order can move forward.
For each loop
The flow uses a For each loop on:
order.fulfillmentOrders
This simply means it checks all fulfillment orders connected to that order.
This step is needed because one order may contain one or more fulfilment orders, and the hold must be released correctly for each one.
Actions performed
1. Release fulfillment order holds
The flow removes the hold from the fulfillment order.
This makes the order available again for the next steps in fulfillment, including shipping label generation.
2. Remove order tag
The flow removes the tag:
ON_HOLD
This shows that the order is no longer blocked.
3. Update order note
The order note is updated with:
Empty
This clears the previous note, because the reason for the hold no longer exists.
How the 2 flows work together
These two workflows create a simple automatic process:
Step 1
An order is created with a locker delivery method.
Step 2
The first flow detects it and places it on hold.
Step 3
The customer selects a collect point from the locker map.
Step 4
The second flow is triggered and releases the order automatically.
Result
The order stays blocked only until the locker is selected, then it becomes ready for shipping label generation without manual intervention.
Why this setup is useful
This automation helps you:
- prevent shipping labels from being created too early
- avoid fulfillment mistakes for locker orders
- clearly mark blocked orders with a tag and note
- automatically release orders once the customer completes locker selection
- reduce manual work for the operations team
Important notes
- The first flow only works correctly if you replace the placeholder text with the correct locker shipping method name.
- The matching is based on the shipping line title, so choose a text that appears consistently in your locker delivery method.
- The second flow depends on the Collect point selected event being triggered when the customer selects the locker from the widget map.
Summary
Use these 2 flows together when you want to control locker orders more safely:
- Flow 1 places locker orders on hold as soon as they are created
- Flow 2 releases them automatically after the customer selects the collect point
This ensures that shipping labels are only created after the locker selection is completed.
PRO TIP
This feature is available to Advanced plan
Feel free to contact us if you need any further information:
Chat: click on the blue chat icon (bottom-right)
E-mail: support@xconnector.app
Phone: +4 0373 747 991
Was this article helpful?
That’s Great!
Thank you for your feedback
Sorry! We couldn't be helpful
Thank you for your feedback
Feedback sent
We appreciate your effort and will try to fix the article