Understanding VAT Configuration
- Configure VAT in the invoicing platform
- Configure VAT in xConnector
- Configure VAT in Shopify
- Configure VAT in Custom Checkout: Releasit or EasySell
- Configure different VAT rates: 11% and 21%
If your company is VAT registered, VAT must be configured correctly in all systems involved in the order and invoice flow.
VAT configuration usually depends on the checkout type used in your store:
- Standard Shopify checkout
- Custom checkout, such as Releasit or EasySell
This article explains where VAT must be configured and how the settings should be aligned between Shopify, xConnector, and the invoicing platform.
Understanding VAT Configuration
VAT handling depends on your company's fiscal setup, the customer's country, the customer type and the order destination.
- Use HOME regime when invoices should follow the VAT rules of your company's country.
- Use OSS regime when invoices should follow the VAT rules of the customer's country.
VAT usage scenarios:
The examples below show how xConnector can send VAT information to SmartBill depending on the order type, customer country and fiscal setup.
Local sale in Romania
A Romanian company sells to a customer located in Romania.
In this case, the invoice normally uses the Romanian VAT rate configured for the shop. The company's national VAT code is used on the invoice.
Example: Romania -> Romania
VAT: Romanian VAT rate 21%
EU sale using OSS
A Romanian company sells to a private customer from another EU country and uses the OSS regime.
In this case, the VAT rate can be applied based on the customer's country. The intra-community / OSS VAT code can be sent to SmartBill and displayed on the invoice.
Example: Romania -> Germany
VAT: German VAT rate 19%
EU sale using home-country VAT
A Romanian company sells to a customer from another EU country, but the invoice must still use the Romanian VAT setup.
In this case, the invoice uses the Romanian VAT rate and the national VAT code of the company.
Example: Romania -> Germany
VAT: Romanian VAT rate
EU B2B sale with reverse charge
A Romanian company sells to a business customer from another EU country, and the customer provides a valid VAT ID.
In this case, the invoice can be generated with 0% VAT and the reverse charge VAT category. A reverse charge note can also be sent to SmartBill for the invoice.
Example: Romania -> France, business customer
VAT: 0% reverse charge
Export outside the European Union
A Romanian company sells to a customer outside the EU.
In this case, the invoice can be generated with 0% VAT using the export VAT category configured in SmartBill.
Example: Romania -> USA
VAT: 0% export
VAT Settings
Configure VAT in the invoicing platform
Follow the VAT settings according to the invoice service you use and fill in it on their platform.
Configure VAT in xConnector

This section is used to configure how xConnector sends VAT information to SmartBill.
Default domestic 0% VAT category: Select the SmartBill VAT category that should be used for domestic orders without VAT.
This setting is useful when an internal order has 0% VAT, but SmartBill requires a specific 0% VAT category for the invoice.
Leave this field empty if you do not need a special 0% VAT category for domestic orders.
Default export 0% VAT category: Select the SmartBill VAT category that should be used for export orders without VAT.
This setting is useful for export orders where VAT is 0%, but SmartBill still needs to receive the correct VAT category on the invoice.
Leave this field empty if you do not need a special 0% VAT category for export orders.
B2B reverse charge enabled: Select Yes if you want to enable the dedicated VAT category for B2B reverse charge lines.
This setting is used for B2B orders where reverse charge applies.
Select No if your store does not use B2B reverse charge.
Intra community VAT code (CIF OSS):
Select Yes if your shop uses an intra-community VAT code / CIF OSS.
This option is used when your fiscal setup requires the intra-community VAT code to be sent to SmartBill.
Select No if this setup does not apply to your company.
Pay VAT on invoice payment:
Select Yes if your company uses VAT on payment.
This means that VAT becomes payable when the invoice is paid, according to your fiscal setup.
Select No if your company does not use VAT on payment.
Shopify override section
Use this section only when you need to replace the VAT information received from Shopify.
Normally, Shopify calculates the VAT for each order, and xConnector forwards this information to SmartBill when generating the invoice.
If some orders were created before VAT was correctly configured in Shopify, Shopify may send those orders with 0% VAT. In this case, you can use the options below to apply the selected VAT rate when generating the invoice in SmartBill.
Important: this override applies one VAT rate only. If your store uses different VAT rates for different products, you should configure VAT correctly in Shopify instead of using the override option.
VAT payer
Choose whether your company is a VAT payer.
- Yes - your company is a VAT payer
- No - your company is not a VAT payer
VAT
Select the VAT rate/category that should be used when overriding the information received from Shopify.
The list of VAT rates is retrieved automatically from SmartBill.
Force VAT payer
Select Yes if you want xConnector to override the tax information received from Shopify and use the selected VAT payer and VAT rate from this section.
Select No if xConnector should keep the VAT information received from Shopify.
Recommendation: enable this option only when you know exactly which VAT setup must be applied.
Force VAT included
This setting controls whether xConnector should override the information received from Shopify about VAT being included in the final price.
Possible options:
- Do not change - xConnector keeps the information received from Shopify
- Yes - xConnector forces VAT as included in the final price
- No - xConnector forces VAT as not included in the final price
Configure VAT in Shopify
By default, Shopify calculates the VAT for each order, and xConnector forwards that information to SmartBill for invoice generation.
Therefore, make sure VAT is correctly configured in Shopify.
- Go to Shopify > Settings > Taxes and duties > enable Collecting tax
Add here all the shipping zones from which you receive orders and need to collect taxes.
example

- Go to Shopify > Settings > Taxes and duties > check the Include sales tax in product price and shipping rate
- Go to Shopify > Settings > Taxes and duties > Global settings > check the Charge sales tax on shipping
example

- Go to Shopify > Products > select a Product > Variants > Edit > check the Charge tax on this product box or Charge tax on this variant (if the product has variants)
example

As a result: Shopify calculates the VAT as included in the total (for both the products and the delivery)
Check if you followed the settings correctly:
Go to Shopify > click on the order's number > check the order details

Important note!
(EN) VAT settings do not apply to existing orders but only to those received after you configured the VAT settings. For the already received orders (before you did the VAT config) use the Force VAT
option and the VAT rate you need on the invoice then uncheck it after you generate the invoices received before the correct settings.
“Force VAT Payer” is an option that overrides the VAT rate calculated by Shopify—but it only supports a single, global rate, not two separate rates.
xConnector - Profile - Connected services - click on the Invoice service - click on Invoice preferences - Force vat payer
--------------------------------------------------------------
(RO) De retinut este ca aceste setari de TVA (odata configurate) se vor aplica doar comenzilor nou primite.
Pentru comenzile vechi - adica primite inainte de setarile de TVA corecte si complete - va trebui sa folositi optiunea Force vat payer: Yes
Dupa ce procesati comenzile vechi - adica primite inainte de setarile de tva corecte si complete - scoateti optiunea Force vat payer: No
Force vat payer este o optiune care suprascrie ce cota tva a calculat Shopify insa e valabila doar pentru o singura cota generala ci nu 2 cote separate
xConnector - Profile - Connected services - click on the Invoice service - click on Invoice preferences - Force vat payer
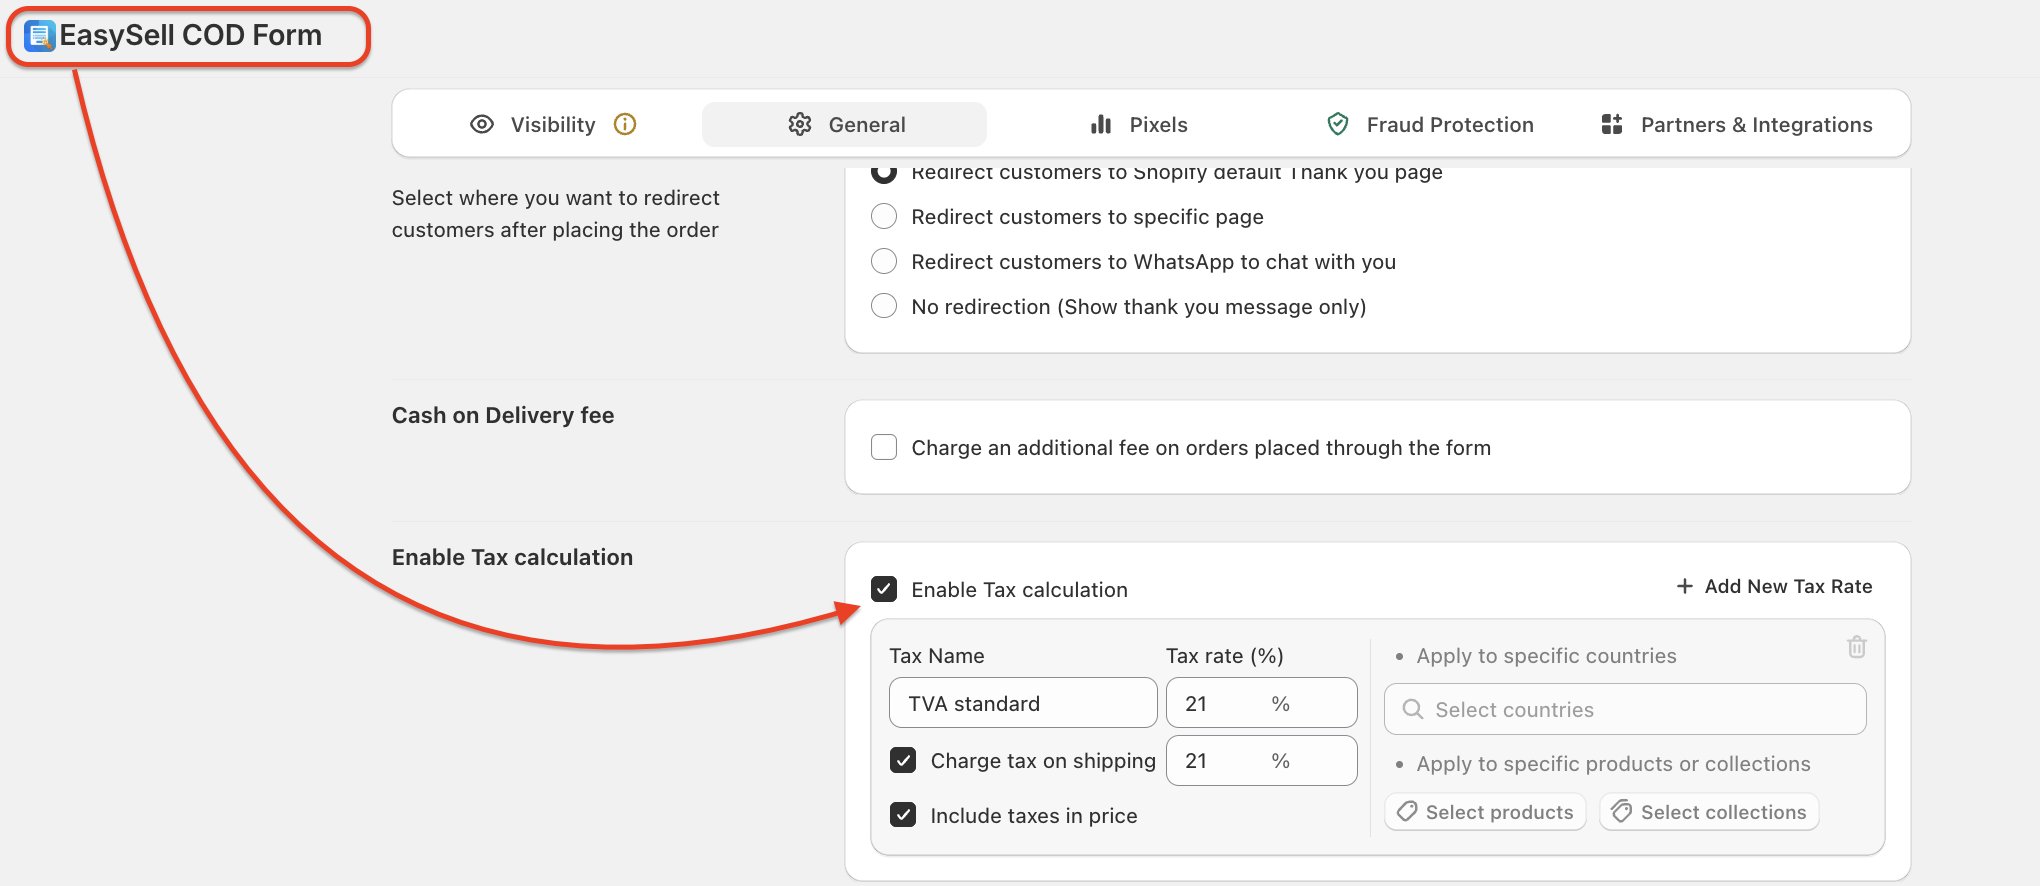
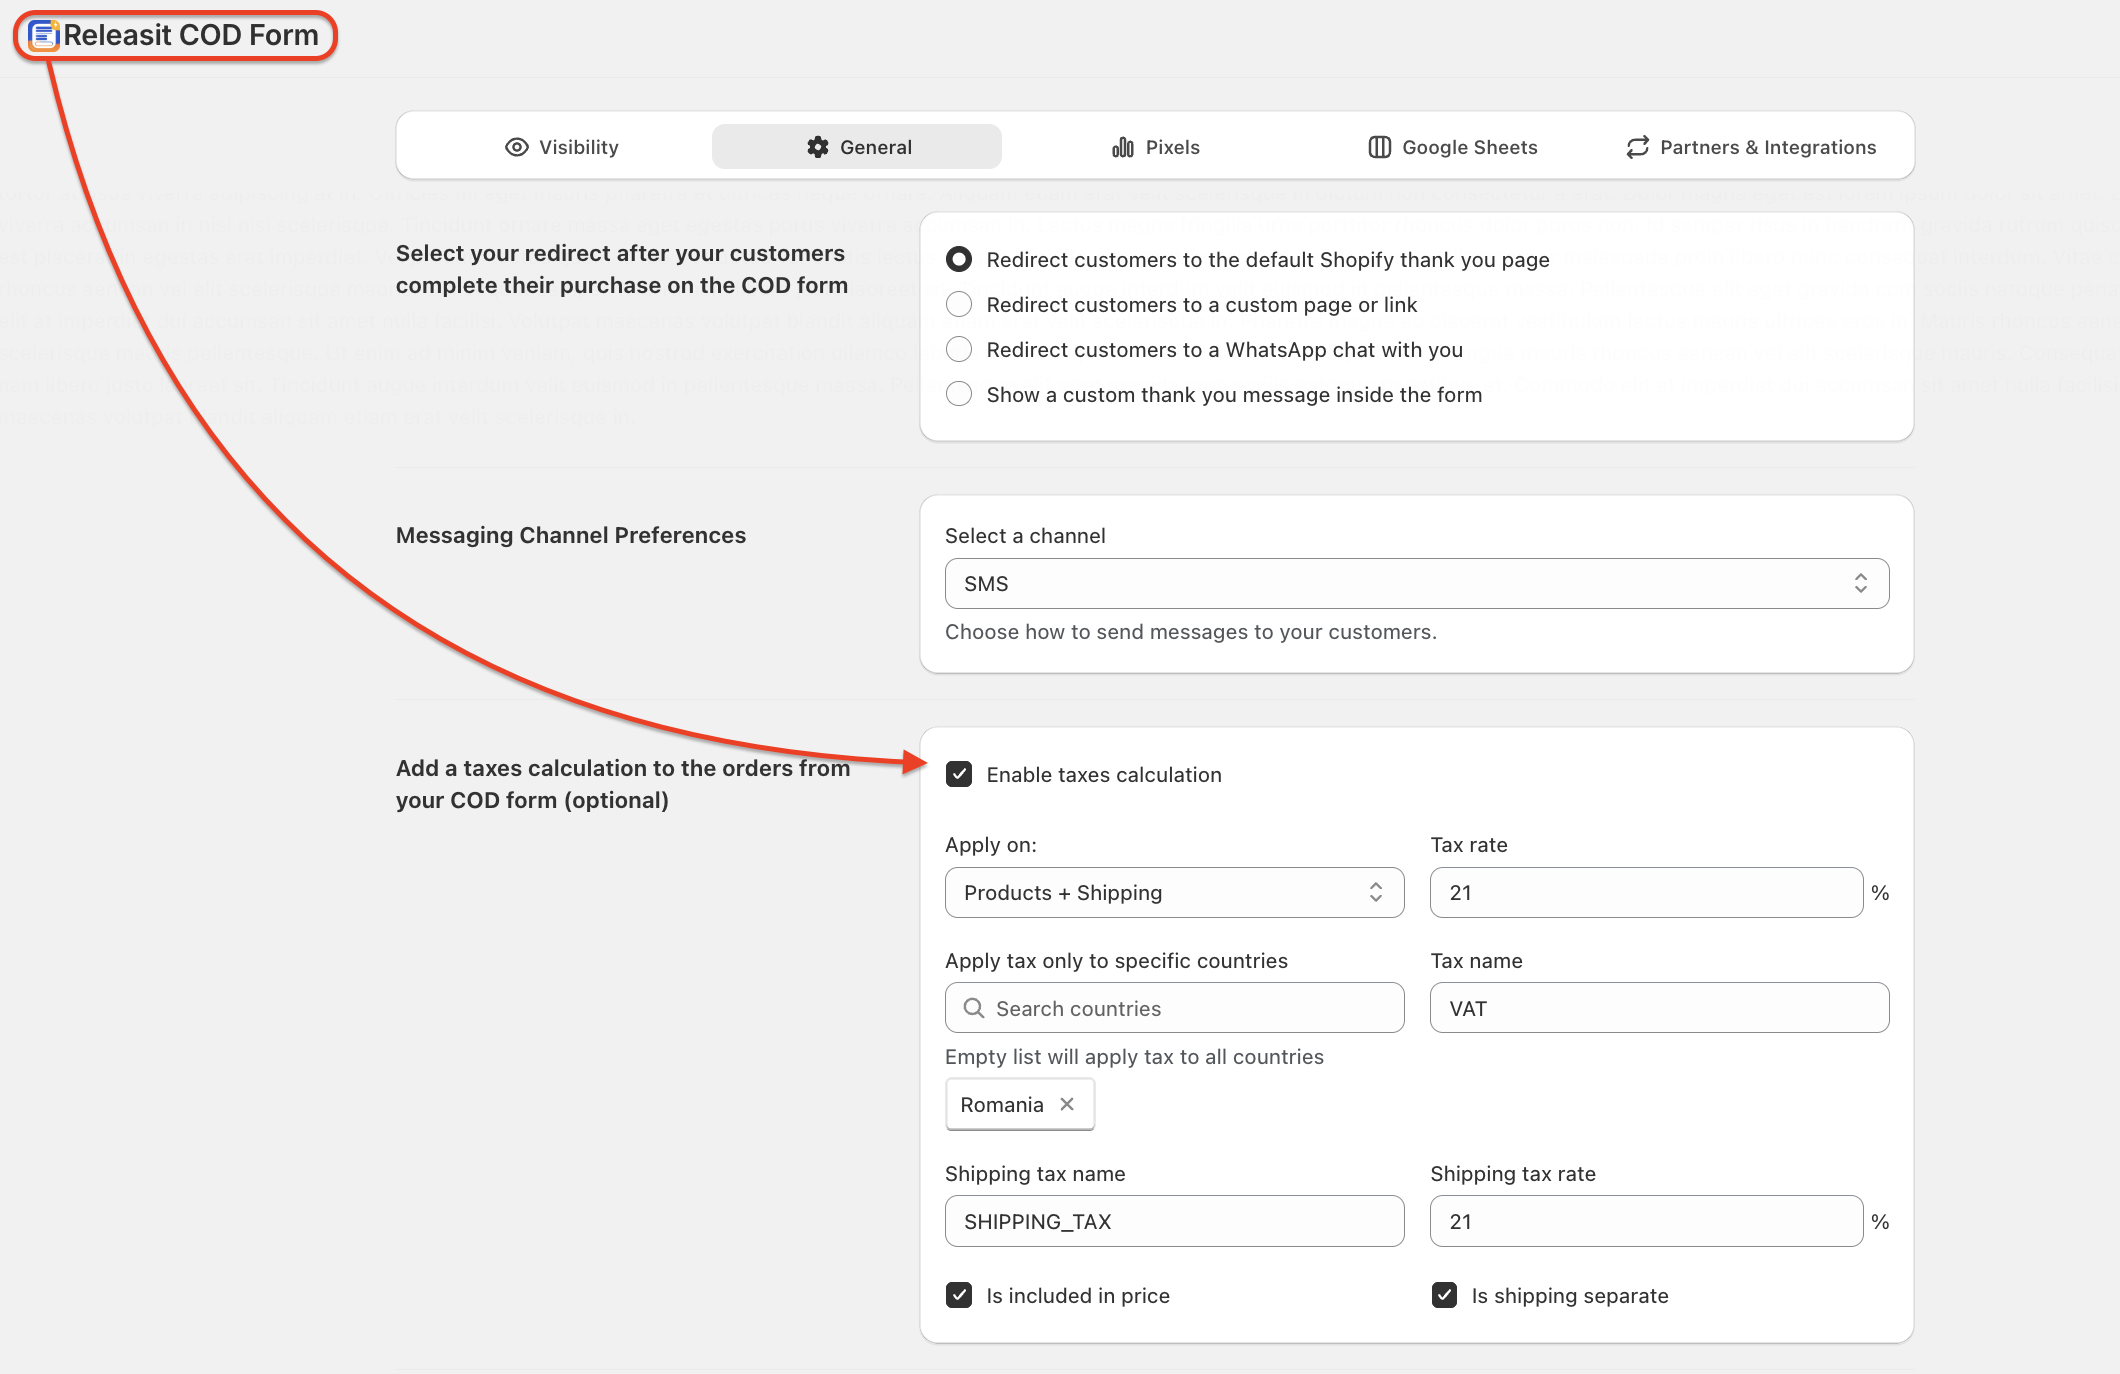
Configure VAT in Custom Checkout: Releasit or EasySell
Check the VAT settings accordingly with your custom checkout
Make sure you set the VAT for products and for shipping also.
After you set your VAT, check in Shopify if you have correctly the VAT line
Configure different VAT rates: 11% and 21%
Click here for the settings.

Contact
➡️ Need help with xConnector? We are just a message away:
Chat: click the blue chat icon (bottom-right)
E-mail: support@xconnector.app
Phone: +4 0373 747 991
➡️ Stay connected with xConnector:
Facebook group: https://www.facebook.com/groups/shopify.romania.xconnector
Facebook page: https://www.facebook.com/xConnectorApp
TikTok: https://www.tiktok.com/@xconnector.app
YouTube: https://www.youtube.com/@xconnector_app
Was this article helpful?
That’s Great!
Thank you for your feedback
Sorry! We couldn't be helpful
Thank you for your feedback
Feedback sent
We appreciate your effort and will try to fix the article